
Project Data
- Location: 5th-floor apartment in Japan
- Apartment Size: Approximately 65 m²
- Layout: 2LDK
- Work Area: Part of the living room ceiling
- Project Type: Partial ceiling wallpaper replacement
- Crew: 2 wallpaper installers + 1 site supervisor
- Working Condition: Occupied home
- Working Time: Approximately 2 hours
- Wallpaper: White embossed wallpaper
- Wallpaper Size: 90 cm wide × 330 cm long
Construction Data
The ceiling wallpaper needed to be partially replaced because part of the gypsum board had been opened to repair plumbing running above the ceiling.
The existing wallpaper was in relatively good condition, and there was no wallpaper backing paper remaining on the area that needed to be repaired. This allowed us to proceed with the surface preparation without having to remove additional layers of wallpaper.
Introduction
Today, I worked on a partial ceiling wallpaper replacement in the living room of a fifth-floor apartment in Japan.
The apartment is approximately 65 m² with a 2LDK layout. The residents were still living in the apartment during the work.
The reason for the repair was plumbing work above the ceiling. Part of the gypsum board had been opened to access and repair the pipes, so new gypsum board had been installed in that area. The wallpaper needed to be replaced after the ceiling repair.
There were two wallpaper installers working on the job, along with one site supervisor from the contractor.
When we arrived, protective sheets had already been placed over the floor and furniture to prevent them from getting dirty or damaged.
Part of the ceiling had also already been repaired with new gypsum board.
Work Process — Site Report
1. Checking the Existing Surface
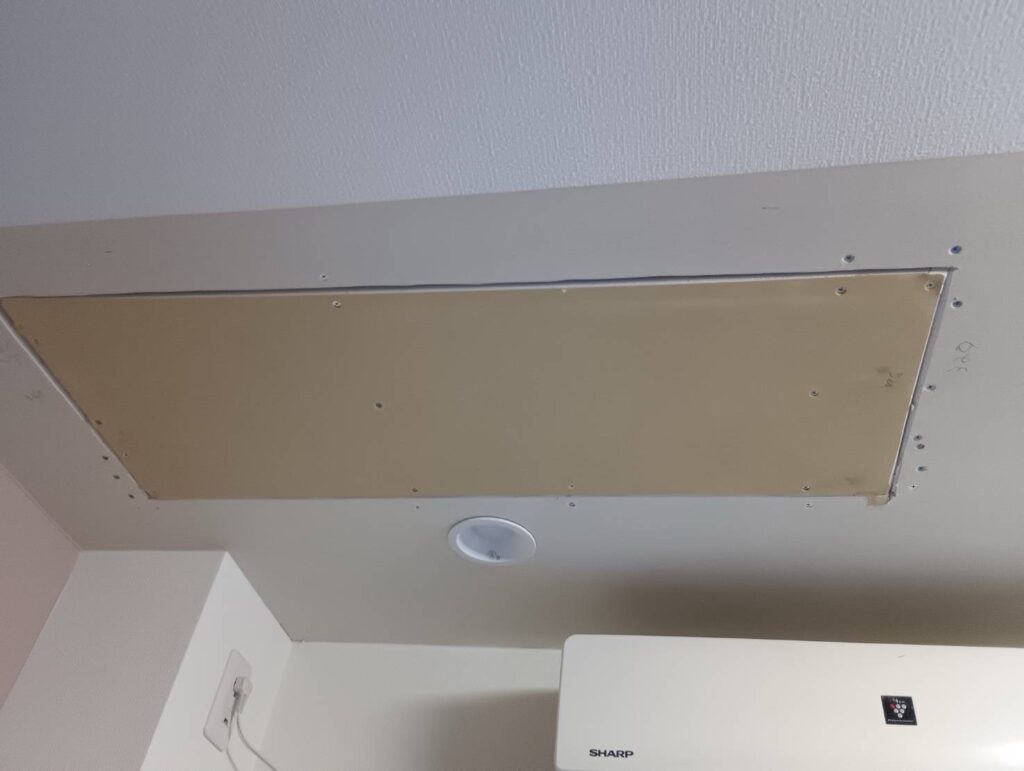
First, we inspected the condition of the existing ceiling.
Fortunately, the old wallpaper backing paper was not remaining on the repair area, and the
gypsum board surface was in good condition.
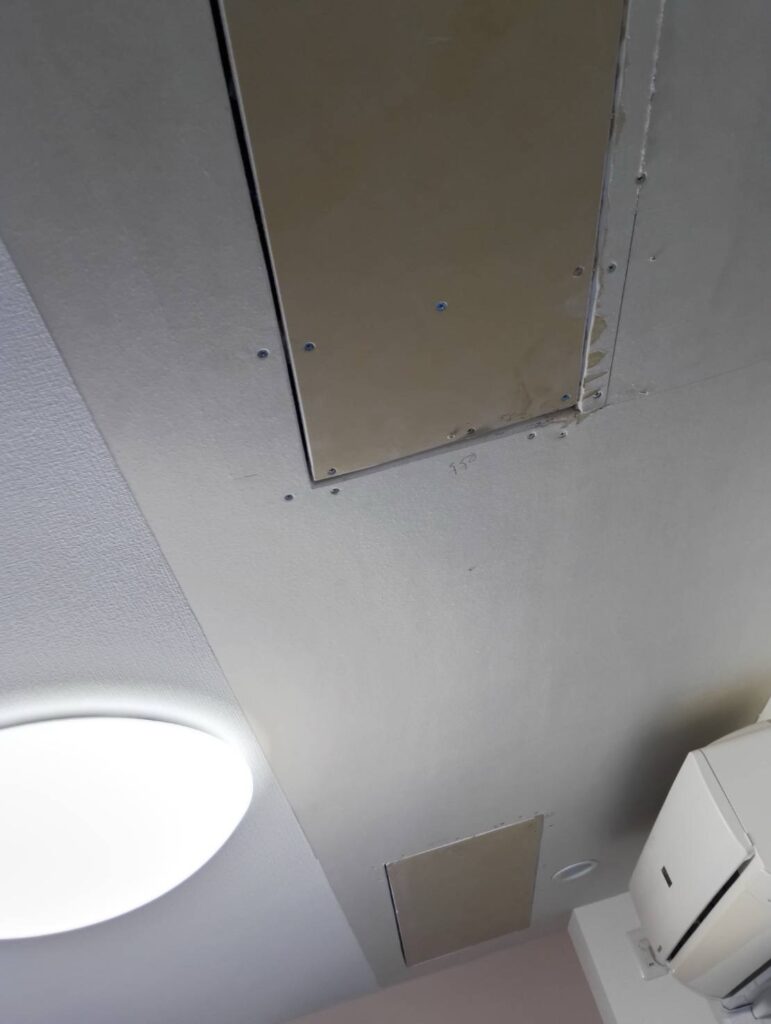
Because the substrate was relatively clean and stable, we could begin preparing the joints between the gypsum boards.
The first step was applying joint compound to the gypsum board joints.
2. Applying the First Coat of Joint Compound
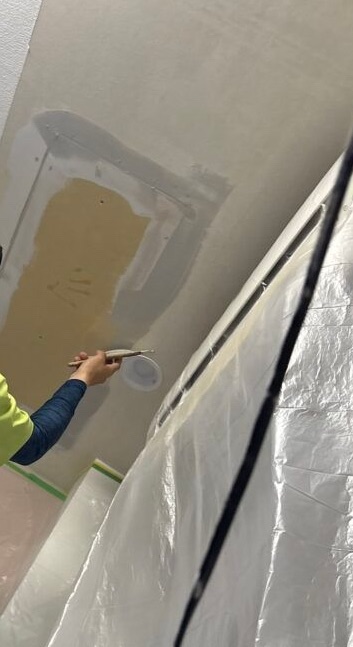
For this project, we applied the joint compound three times.
I paid particular attention to the consistency of the compound.
For the first coat, I used slightly less water and mixed the compound to a relatively firm consistency.
This helps the compound penetrate deeper into the joint and allows the material inside the joint to dry more efficiently.
For the second and third coats, I added slightly more water and made the compound softer.
The softer compound can be spread more thinly over the first coat, effectively covering the entire surface and creating a smoother transition.
This step is important because the goal is not simply to fill the joint, but to create a flat surface that will not show through the wallpaper.
3. Drying the Joint Compound
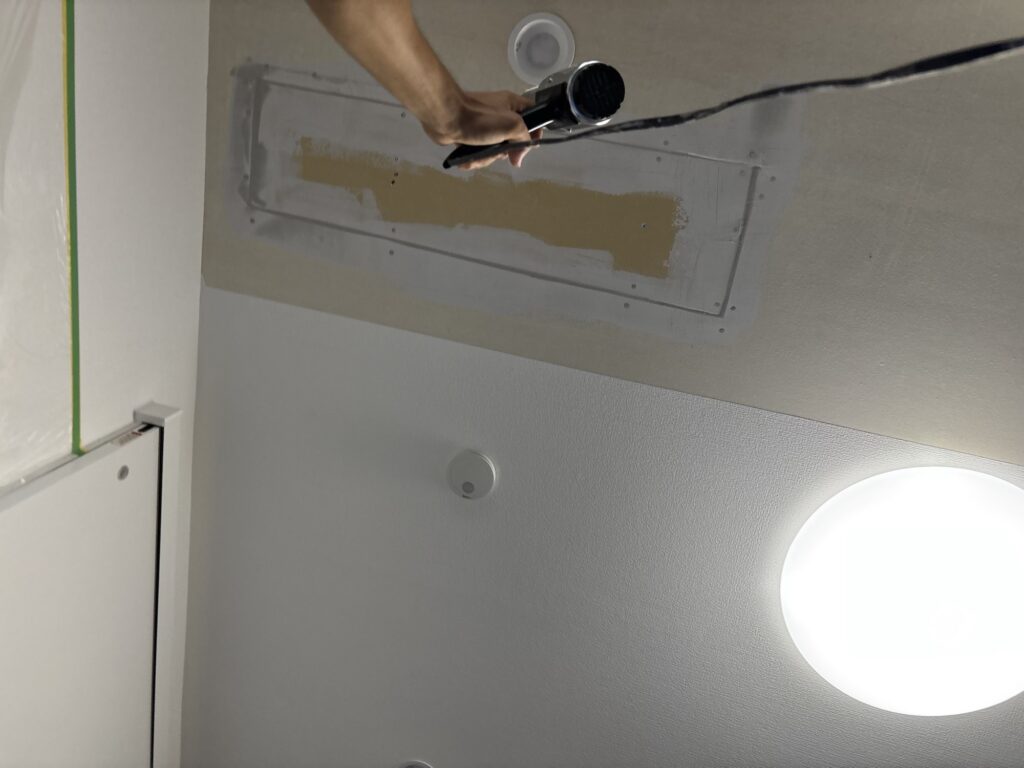
After applying the joint compound, we used a heat gun to help dry the surface.
The drying process needs to be controlled carefully. The compound should be sufficiently dry before the next layer is applied.
Once the base coats were dry, we moved on to the finishing compound.
4. Applying the Finishing Compound
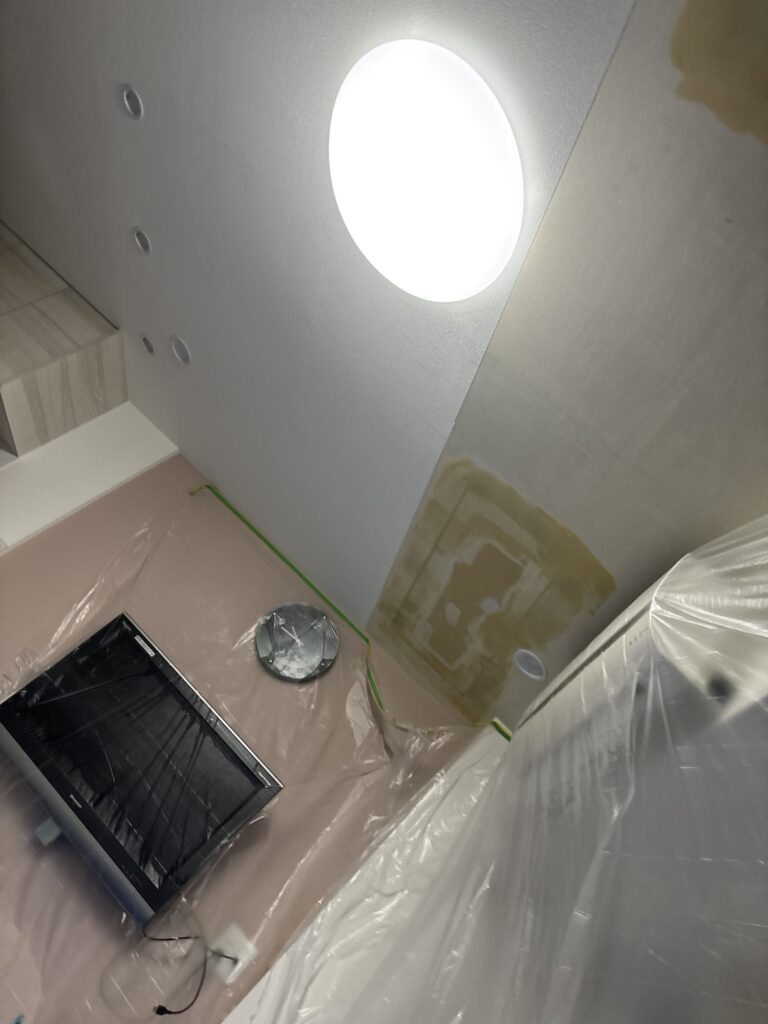
The finishing compound was applied over the joint, extending wider than the base compound underneath it.
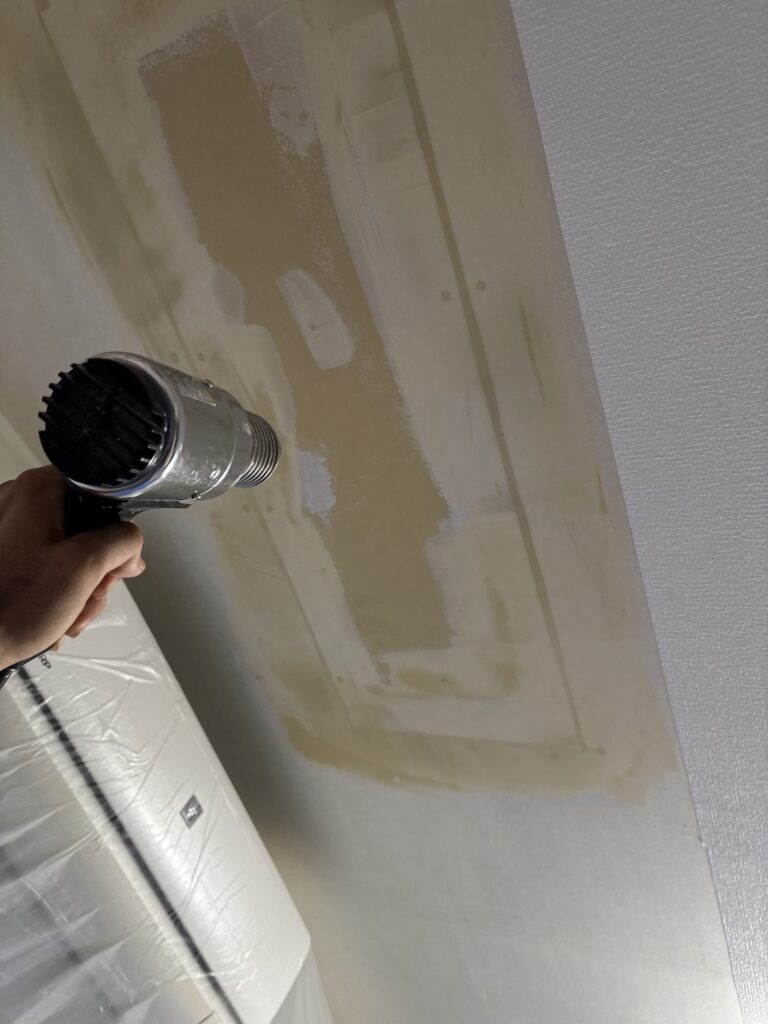
This is an important part of the preparation.
Base joint compound does not provide the best surface for wallpaper adhesive to grip. Therefore, I made the finishing-compound area wide enough to properly cover the base compound and create a suitable surface for the wallpaper.
After the finishing compound dried, the surface was ready for wallpaper installation.
5. Preparing the Wallpaper
The wallpaper material had already been prepared the day before.
The material used for this project was a white wallpaper with a noticeable embossed texture.
It was relatively easy to handle and install.
Each piece was approximately:
- Width: 90 cm
- Length: 330 cm
The edges of the existing wallpaper had been cut very straight.
Because the existing edges were clean and straight, and because the new material was easy to work with, we decided to install the new wallpaper using a butt joint.
With a butt joint, the edges of two wallpaper sheets meet directly without overlapping.
If the existing edge is not straight enough, another technique is used instead. In that case, two sheets can be overlapped and then cut together to create a clean joint.
6. Installing the Wallpaper
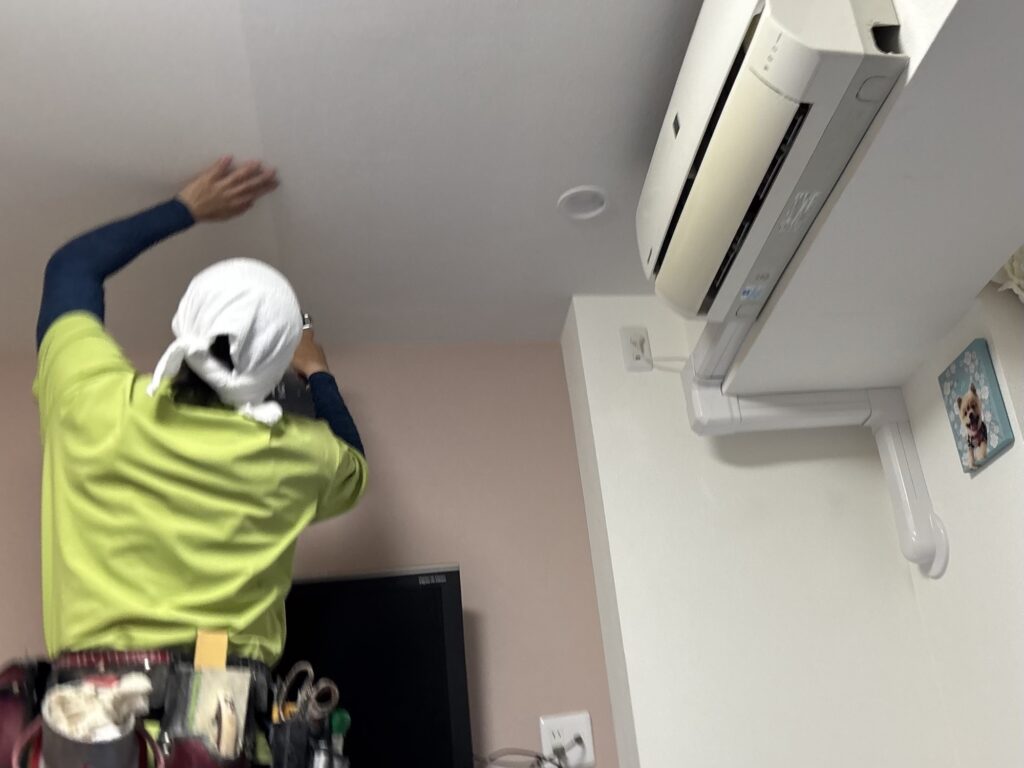
Once the surface preparation was complete, two installers worked together to hang the wallpaper.
We carefully aligned the new wallpaper with the existing wallpaper.
As we installed the material, we used a wallpaper smoother to remove air bubbles.
The bubbles were pushed from the center toward the outside edges.
Working from the center outward helps prevent air from becoming trapped underneath the wallpaper.
We continued this process until the entire repair area was covered.
7. Dealing With Color Differences
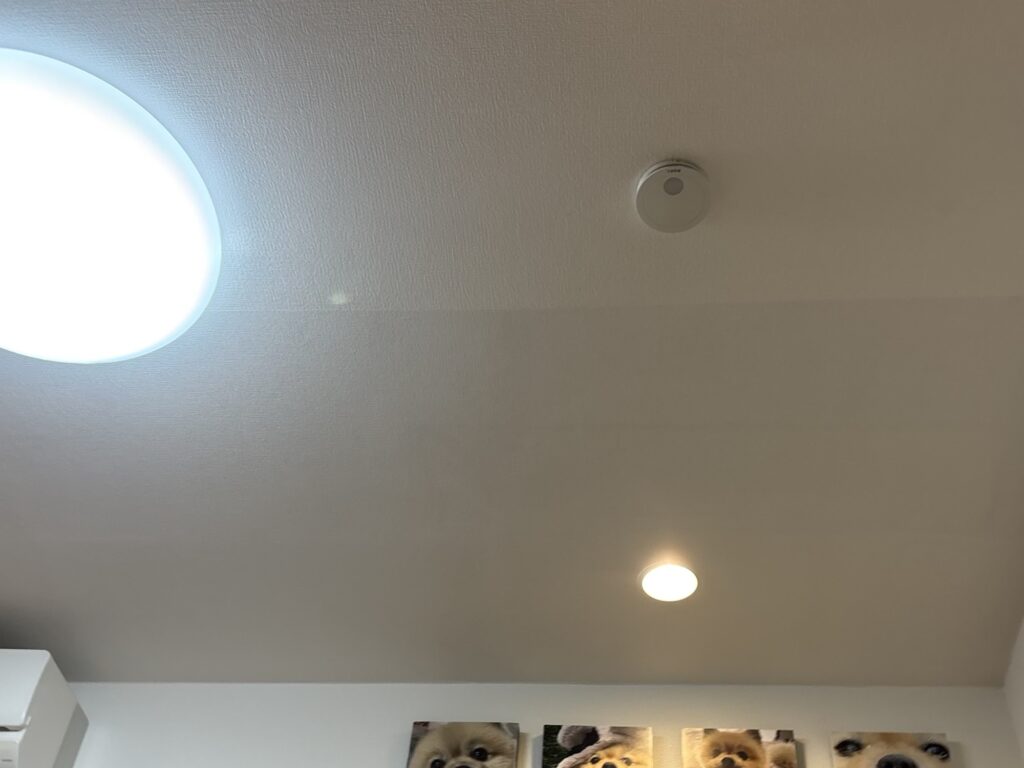
After the wallpaper was installed, the new wallpaper initially appeared to have a slightly different color from the existing wallpaper.
This is something that can happen with Japanese wallpaper.
Even when the wallpaper has the exact same product number, the color can vary slightly between different production lots.
There is also another factor to consider.
Freshly installed wallpaper still contains moisture from the adhesive. Because of this, the surface can temporarily look slightly darker or different from the surrounding wallpaper.
The photos taken immediately after installation showed this temporary difference.
As the adhesive dries and the wallpaper settles, the new wallpaper should become closer in appearance to the existing material.
This is also something worth explaining to the customer beforehand.
Clear communication can prevent unnecessary concerns immediately after the installation.
8. Applying White Caulk to the Inside Corner
The wallpaper on the surrounding walls was not being replaced during this project.
Because of this, the cut edge at the inside corner was slightly noticeable.
To improve the appearance of the corner, we applied white caulk along the joint.
This helped create a cleaner and more uniform finish between the new ceiling wallpaper and the existing wall wallpaper.
9. Cleaning Up
After completing the wallpaper installation and finishing the corner, we cleaned the work area.
The protective sheets were removed, the area was organized, and the furniture and floor were checked.
Once everything was cleaned and organized, the project was complete.
The total working time was approximately two hours.
Related Project
Replacing Water-Damaged Wallpaper in a Small Japanese Kitchen – A 25 m² 1DK Apartment Project
Tools Used
The following tools and equipment were used for this project:
- Putty knives
- Joint compound
- Sanding tools
- Heat gun
- Wallpaper smoother
- Wallpaper cutting tools
- Wallpaper adhesive
- Measuring tools
- Protective sheets
- White caulk
The exact tools can vary depending on the condition of the substrate and the type of wallpaper being installed.
Professional Tips
1. Adjust the consistency of the joint compound
The consistency of the compound can affect both application and drying.
For the first coat, a slightly firmer mixture can help the compound fill the deeper part of the joint.
For subsequent coats, a softer mixture allows the compound to be spread more thinly and smoothly.
2. Make the finishing coat wider
The finishing compound should extend beyond the edges of the base compound.
This creates a smoother transition between the repaired area and the surrounding gypsum board.
3. Check the existing wallpaper edges
Before deciding how to make the wallpaper joint, check whether the existing wallpaper edge is straight.
If the edge is clean and straight, a butt joint may be suitable.
If the edge is uneven, overlapping the sheets and performing a double cut can produce a cleaner result.
4. Explain color differences to the customer
Newly installed wallpaper can look different from older wallpaper immediately after installation.
Production-lot differences and moisture from the adhesive can both affect the appearance.
Explaining this before or immediately after installation helps set the customer’s expectations.
5. Pay attention to inside corners
When only the ceiling is being replaced, the cut line at the inside corner can sometimes become noticeable.
A small amount of matching caulk can help create a cleaner transition.
Common Mistakes to Avoid
Applying the finishing compound too narrowly
If the finishing compound is not wide enough, the transition between the repaired area and the existing ceiling can remain visible after the wallpaper is installed.
Installing wallpaper before the compound is completely dry
Moisture underneath the wallpaper can affect the final appearance and adhesion.
Always make sure the substrate is sufficiently dry before installation.
Ignoring the condition of the existing wallpaper edge
Trying to create a butt joint against an uneven existing edge can result in a noticeable seam.
The existing edge should be inspected before choosing the jointing method.
Assuming the color difference means the wrong wallpaper was used
Freshly installed wallpaper may temporarily look different from older wallpaper.
The adhesive moisture and differences between production lots can both contribute to this.
Forgetting to explain the situation to the customer
Even when the installation is technically correct, a customer may become concerned if the new wallpaper initially looks different.
A simple explanation beforehand can make the handover much smoother.
What I Learned From This Project
This project was relatively small, but it reminded me that even a partial wallpaper repair requires careful preparation.
The actual wallpaper installation only took part of the overall working time. A significant amount of attention was required for preparing the gypsum board joints and creating a smooth surface.
I was also reminded of the importance of adjusting the consistency of the joint compound depending on the stage of the work.
Using a firmer mixture for the first coat and a softer mixture for the following coats can make it easier to build up the surface gradually.
Another important point was customer communication.
A difference in color immediately after installation does not necessarily mean there is a problem with the wallpaper. Understanding the effects of production lots and adhesive moisture helps explain what the customer is seeing.
Even a small repair can involve several technical decisions, and paying attention to these small details is what helps produce a professional finish.
FAQ
1. Why did the ceiling wallpaper need to be replaced?
Part of the gypsum board had been opened to access plumbing above the ceiling. After the gypsum board was repaired, the wallpaper in that area also needed to be replaced.
2. How long did this wallpaper repair take?
The entire job took approximately two hours.
3. How many people worked on the project?
Two wallpaper installers worked on the installation, with one site supervisor from the contractor also present.
4. Can wallpaper be installed over newly installed gypsum board?
Yes, but the gypsum board joints and surface need to be properly prepared first. Joint compound should be applied and finished so that the surface is smooth enough for wallpaper installation.
5. Why was the joint compound applied three times?
Multiple coats allow the joint to be built up gradually and create a smoother transition between the gypsum boards and the surrounding surface.
6. Why was a firmer mixture used for the first coat?
A firmer mixture can help fill the deeper part of the joint effectively and can dry relatively quickly.
7. Why did the new wallpaper look different from the existing wallpaper?
There can be slight color differences between different production lots, even when the product number is the same. Freshly installed wallpaper can also look different temporarily because the adhesive still contains moisture.
8. What is a butt joint?
A butt joint is a wallpaper joint where two sheets are placed edge-to-edge without overlapping.
9. What should be done if the existing wallpaper edge is not straight?
If the existing edge is uneven, two sheets can be overlapped and then cut together to create a cleaner joint.
10. Why was white caulk used at the inside corner?
Because the surrounding wall wallpaper was not replaced, the cut edge at the corner was slightly noticeable. White caulk helped create a cleaner transition between the new ceiling wallpaper and the existing wall.
Related Project
Water-Damaged Ceiling Board Replacement and Navy Wallpaper Installation in a 20 m² Apartment
Conclusion
This was a small but technically detailed ceiling wallpaper repair in an occupied Japanese apartment.
The project involved repairing the wallpaper after part of the gypsum board had been opened for plumbing work.
Although the repair area was limited, careful surface preparation, proper joint-compound application, accurate wallpaper alignment, and attention to the existing wallpaper were all important.
The use of different joint-compound consistencies, careful drying, and the correct wallpaper jointing method helped achieve a clean finish.
The project was completed in approximately two hours.
Small repair projects like this are a good reminder that professional wallpaper installation is not only about hanging the wallpaper. Much of the final quality depends on the preparation work underneath it and the attention paid to small details.


Comments